
AWS CODEPIPELINE-BASED CI SOLUTION FOR PROJECTS, HOSTED ANYWHERE, USING SVN AS AN EXAMPLE
Abstract: AWS CodePipeline source action is typically used to download source code, which is used in its build action. It is convenient, available out-of-the-box and supports a variety of different code repositories. This article describes a solution to develop a pipeline for almost any source code repository or storage, which is not supported by AWS CodePipeline source action yet. Using the example of SVN pipelines, we will show how to build a working solution for real-life usage with automatic creation/starting and deletion of pipelines, which are triggered by SVN create branch/commit and delete branch operations. Source code for the solution is included.
Introduction
As of the time of writing this article, AWS CodePipeline supports the following services in source action: Amazon S3, AWS CodeCommit, GitHub, Amazon ECR and AWS CodeStar Connections (see integrations with CodePipeline). A common question is: What if you would like to create CI pipelines for projects, with source code hosted in a code repository or storage, that is not supported by AWS CodePipeline yet? Can we use AWS CodePipeline for this? And the answer is: “Absolutely!”. The idea is pretty simple: We can omit using AWS CodePipeline source action, download source code and run build scripts in the build action of the pipeline, utilizing AWS CodeBuild.
Note: This article is describing a solution for building CI pipelines in AWS and assumes that you have experience in AWS Developer Tools, bash scripting, Terraform, Docker, Linux, and have a good understanding of the application build process.
Let me describe this using an example where we will be building a pipeline for Subversion (SVN). I’ll begin with how SVN pipelines work first, and then I’ll cover automation.
Note: Although this article continues with a description of a solution using SVN, you can easily modify it for other types of repositories. SVN has been chosen because I needed to create CI pipelines in AWS to build projects, hosted in SVN.
How SVN Pipelines Work
For each project/branch pair, a new instance of an AWS CodePipeline will be automatically created. This will reuse common resources, such as IAM roles, security groups, etc. Each pipeline will consist of 2 actions: source and build. Let me describe how each stage works.
Pipeline Source Stage
For source action we use Amazon S3 as a provider:
{
    "name": "Source",
    "actions": [
        {
            "name": "Source",
            "actionTypeId": {
                "category": "Source",
                "owner": "AWS",
                "provider": "S3",
                "version": "1"
            },
            "runOrder": 1,
            "configuration": {
                "S3Bucket": "[[[build_bucket_name]]]",
                "S3ObjectKey": "svn_pipelines/common_build_resources.zip"
            },
            "outputArtifacts": [
                {
                    "name": "source_output"
                }
            ],
            "inputArtifacts": []
        }
    ]
}
During the source stage, the pipeline downloads common_build_resources.zip from our Amazon S3 build bucket, and passes its contents to the build stage.
Pipeline Build Stage
We use AWS CodeBuild for the pipeline build stage. Only one build stage of a specific pipeline can be run at a particular moment in time.
Note: This makes perfect sense, as each pipeline should represent a specific branch in a specific project. You could think of Jenkins pipeline settings, where you specify the project and branch to build. Sometimes it is more complicated, and there are so-called superseded executions.
The build state ‘lives’ in pipelines, not in the AWS CodeBuild project. This allows us to avoid creating a new project for each new pipeline and reuse the same AWS CodeBuild project for all pipelines! In this configuration, we preserve the ability to build different SVN projects as well as its developer branches in parallel.
In our case, we should somehow “notify” AWS CodeBuild project which SVN project to checkout. This is where SOURCE_PROJECT and SOURCE_BRANCH come into play. These are supplied by the pipeline, which stores them in the EnvironmentVariables block of its build stage configuration:
"configuration": {
    "EnvironmentVariables": [
      {
        "name": "SOURCE_PROJECT",
        "type": "PLAINTEXT",
        "value": "project1"
      },
      {
        "name": "SOURCE_BRANCH",
        "type": "PLAINTEXT",
        "value": "branches/feature_branch_1"
      }
    ],
    "ProjectName": "svn-codebuild-project"
}
When the AWS CodeBuild project starts, it follows instructions specified in buildspec.yml, which is provided by the pipeline source action.
In buildspec.yml we invoke build_stub.sh, which runs the svn command-line utility to checkout code from the SVN repository:
svn checkout --username ${SVN_USER} --password ${SVN_PASSWORD} svn://svn/${SOURCE_PROJECT}/${SOURCE_BRANCH} .
We store SVN_USER and SVN_PASSWORD in encrypted form in AWS Secrets Manager Parameter Store and read them during pipeline execution:
env:
  parameter-store:
    SVN_USER: /build/svnUser
    SVN_PASSWORD: /build/svnPassword
Each SVN project has a build.sh script, which contains build commands, specific to project. After checking out the source code, build_stub.sh invokes the build.sh script to start the build process.
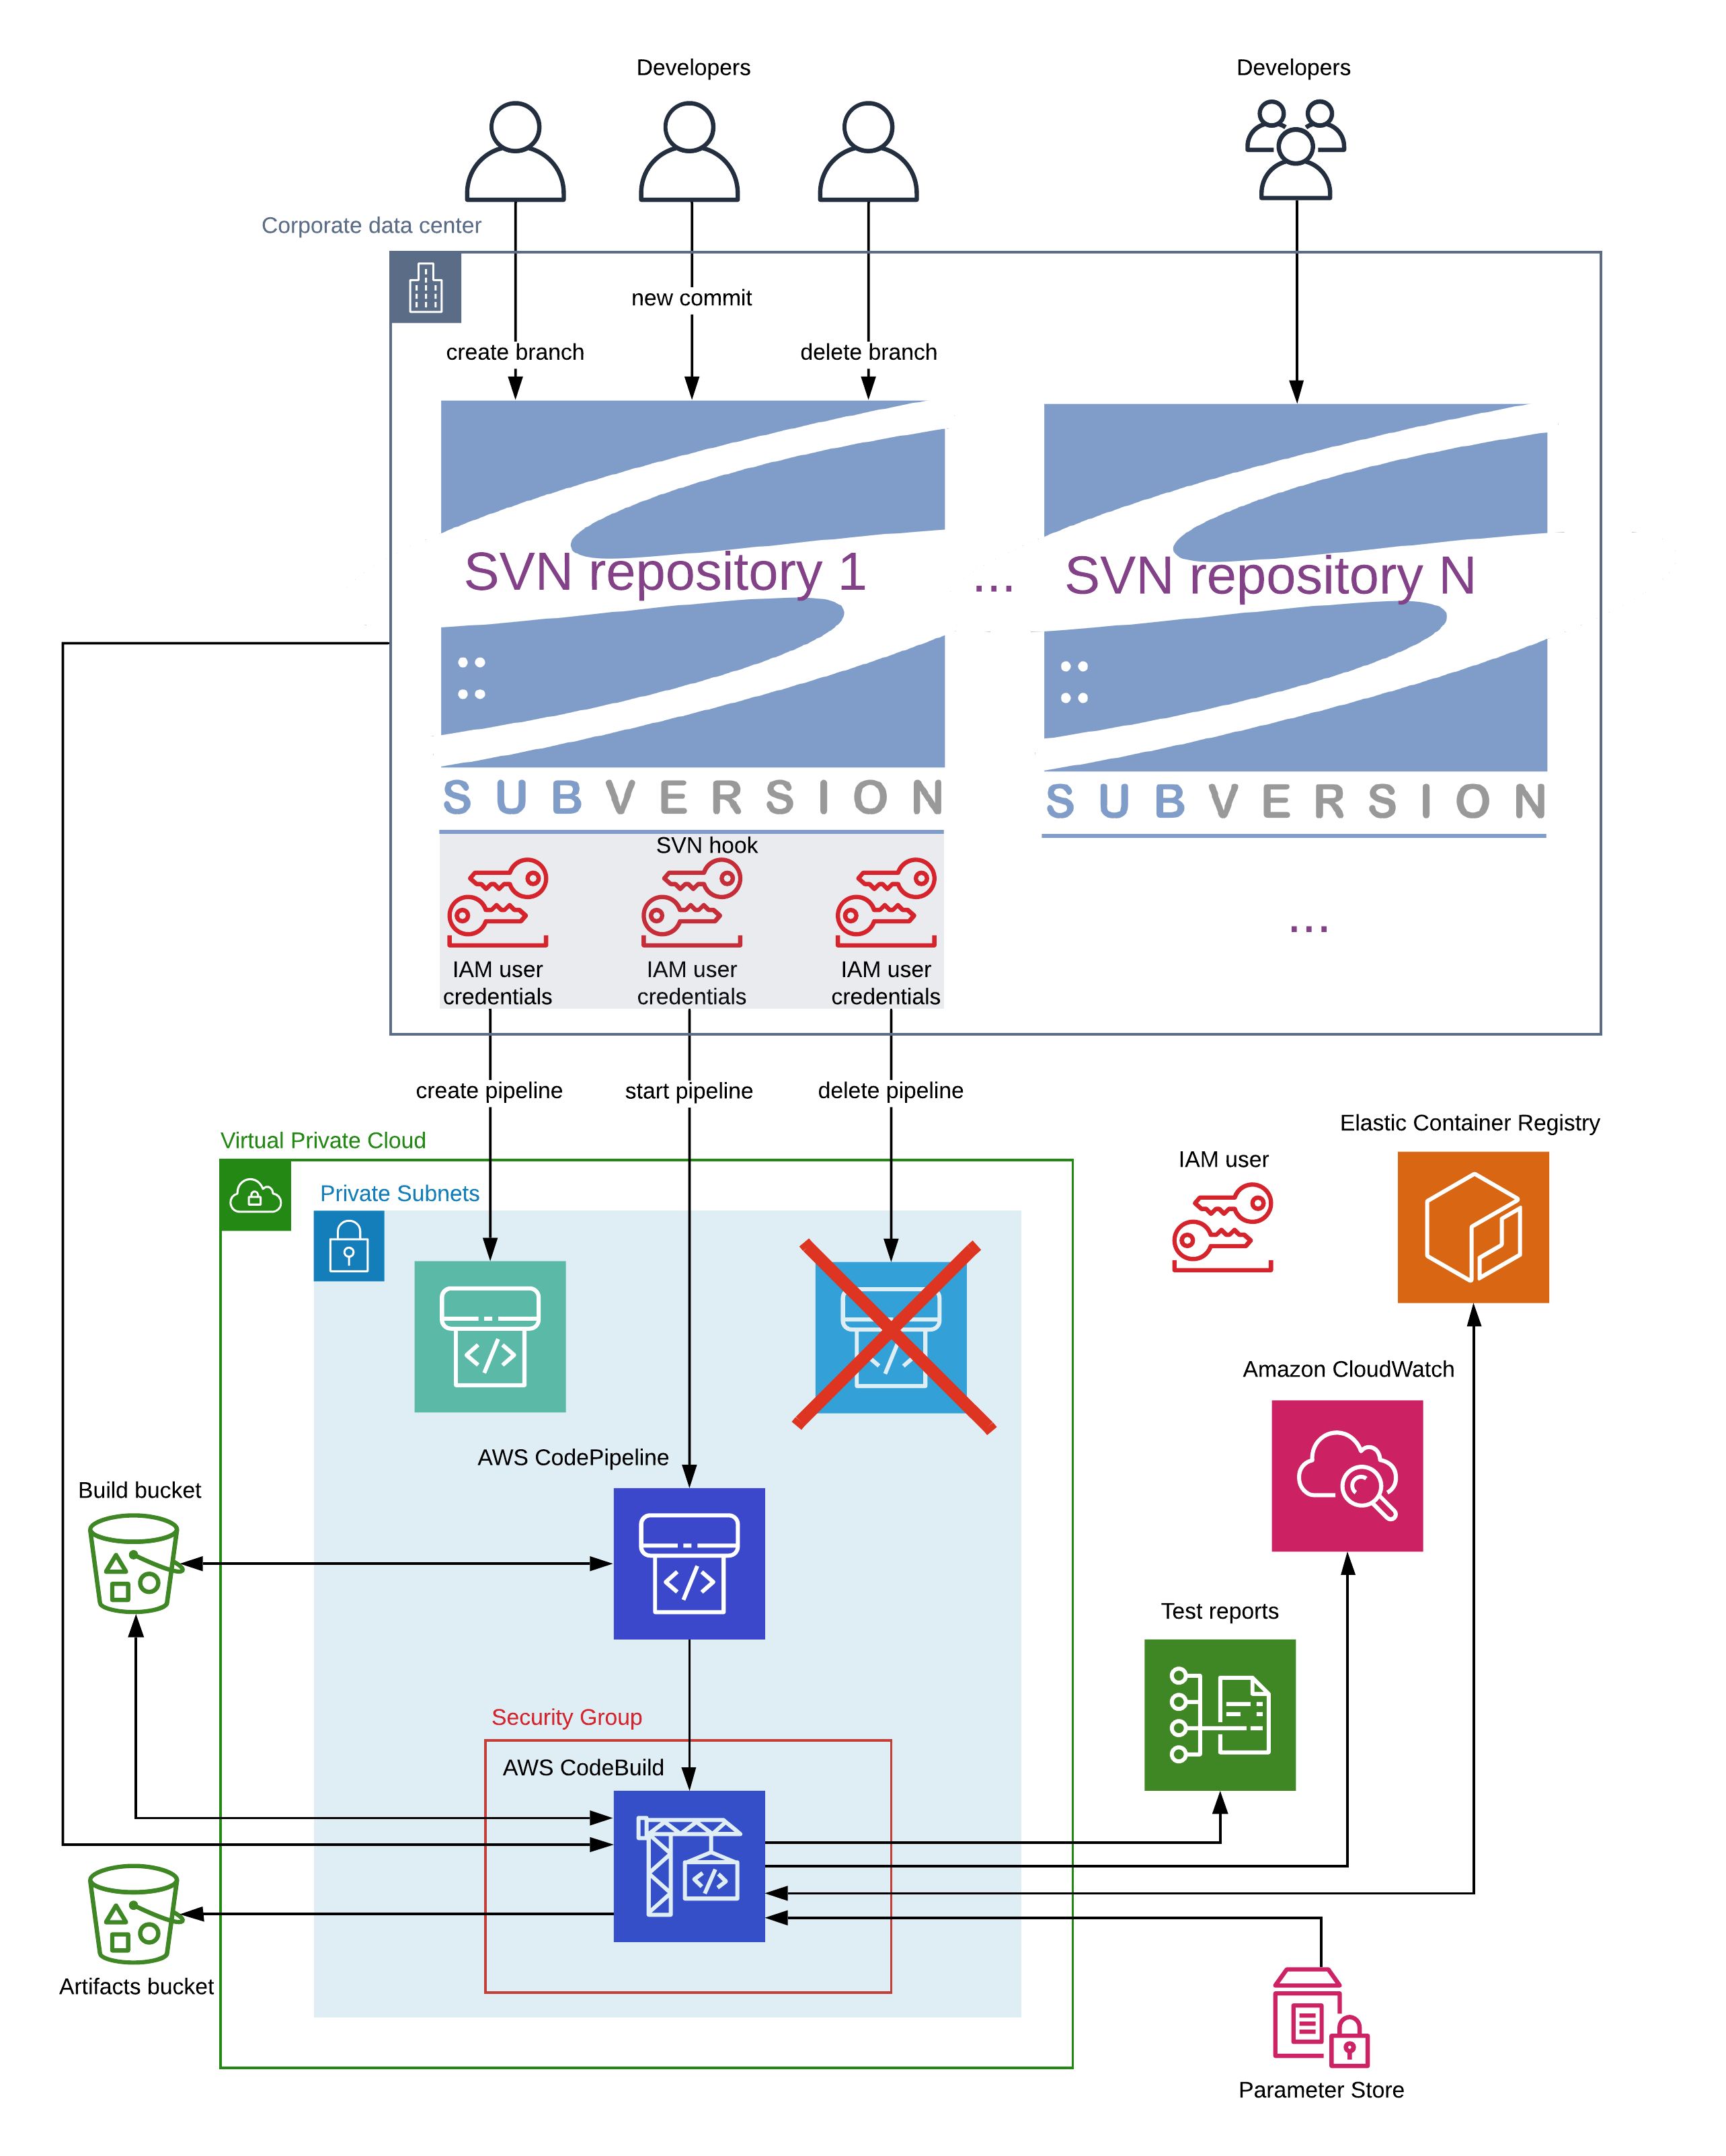
SVN Pipelines Automation
You can say: “That’s great, but what about automation?”. And this is a good question, as creating pipelines manually is not developer-friendly. The good news is that we can have automation as well! I have added the following automation to SVN pipelines:
- When a developer creates a new branch in an SVN project, a new pipeline is created.
- When a developer commits a change to a branch, it’s pipeline is started.
- When a developer finishes working on a feature branch and merges their changes to trunk and deletes the branch - then the pipeline is deleted.
All of these operations are working using an SVN post-commit hook, which is a simple Bash script, placed on an SVN server in the corporate data center. The SVN server commits the transaction and runs this script with information about the commit. Using this information, we invoke the svnlook SVN server utility to obtain the changeset
changelog=$(svnlook changed $REPOSITORY_PATH --revision $REVISION)
and run the AWS CLI with IAM user credentials to create, delete or start the pipeline:
#find op: create/delete/commit
if [[ $FIRST_LINE == "A   branches/"* ]] && [ "${FIRST_LINE: -1}" == "/" ] && [ $FIRST_LINE_SLASHES_COUNT == 2 ]
then
  echo "Creating pipeline <$PIPELINE_NAME>"
  PIPELINE_TEMPLATE=`PROJECT_NAME=$PROJECT_NAME BRANCH_NAME=$BRANCH_NAME envsubst < $SVN_SERVER_HOME_DIRECTORY/pipeline.tmpl`
  PIPELINE_TEMPLATE=`echo $PIPELINE_TEMPLATE | tr -d ' '`
  aws codepipeline create-pipeline --cli-input-json $PIPELINE_TEMPLATE
elif [[ $FIRST_LINE == "D   branches/"* ]] && [ "${FIRST_LINE: -1}" == "/" ] && [ $FIRST_LINE_SLASHES_COUNT == 2 ]
then
  echo "Deleting pipeline <$PIPELINE_NAME>"
  aws codepipeline delete-pipeline --name $PIPELINE_NAME
else
  echo "Starting pipeline <$PIPELINE_NAME>"
  aws codepipeline start-pipeline-execution --name $PIPELINE_NAME
fi
When we create a new branch in SVN, our post-commit hook uses a template file pipeline.tmpl to create a new pipeline and sets values for the SOURCE_PROJECT and SOURCE_BRANCH environment variables in the pipeline configuration.
More on Project Build Using a Real-world Scenario
Now that we have discussed how pipelines work and how to automate them, let’s move on to the question of how they can be used to build real-world applications.
For our builds, we are using a custom Docker image, which is published to our Amazon ECR repository.
Note: you can build this image by yourself and add to it all of the tools which are needed to build your projects. Sorry, but preparing an image like this is beyond the scope of this article and is not covered here. You can use one of the AWS CodeBuild standard images with slight modifications to code in this article, but for better customization and to speed-up the build process, it is preferable to use a custom image. In this article, I will show how you how to do it.
Let’s assume that we are going to build a Java web application using Gradle and run Selenium web tests. Let’s consider how to make this work in more detail.
AWS CodeBuild pulls our custom Docker image from the Amazon ECR, uses it to start a Docker container, and executes commands from the buildspec.yml. This starts a Docker daemon, checks out our project’s source code from SVN using environment variables and SVN server credentials (read from SSM Parameter Store secrets) and runs the build.sh script. Our projects have different structures (some of them are just simple libraries, others are complex web applications with several Gradle subprojects), and thus require custom build.sh scripts. We store these scripts in the root of the SVN repository of each project. Our Gradle build scripts perform the build, run unit tests, pull Docker images for the database server and headless Chrome from Docker repositories, then start all of the Docker containers and run the Selenium web tests.
After the build finishes, we save reports to the Amazon S3 build bucket, collect all of the test results in the ./test-results folder for AWS CodeBuild Test Reports feature and then publish new Docker images with our web application to the Amazon ECR repository (see SVN pipelines architecture diagram below). If we are building Angular applications, we can zip and upload artifacts to our artifacts Amazon S3 bucket for our deployment pipelines.
If the build fails, you can look into the following places to find the reasons why this happened:
- Build console output in CloudWatch logs;
- Test reports in AWS CodeBuild Console;
- Reports in Amazon S3 bucket (in case of the static code analysis tool fails the build).
The next section is dedicated to showing you typical examples of commands, which we use in our projects.
Commands Which We Use In Our build.sh
-
Build the Gradle Java project:
./gradlew build -
Save build reports to the Amazon S3 bucket:
zip -r -q reports.zip ./build/reports aws s3 cp reports.zip s3://[[[your_build_bucket_name]]]/reports/${SOURCE_PROJECT}/${SOURCE_BRANCH}/${CODEBUILD_LOG_PATH}.zip -
Prepare test results for the AWS CodeBuild reports feature:
mkdir -p test-results/test cp ./build/test-results/test/*.xml test-results/test mkdir -p test-results/testbatch cp ./app1-batch/build/test-results/test/*.xml test-results/testbatch mkdir -p test-results/testclient cp ./app1-client/build/test-results/test/*.xml test-results/testclient -
Publish Docker images for web and batch applications, created during the build process:
`$(aws ecr get-login --no-include-email)`

docker tag app1:latest $AWS_ACCOUNT_ID.dkr.ecr.ca-central-1.amazonaws.com/app1:$IMAGE_TAG
docker push $AWS_ACCOUNT_ID.dkr.ecr.ca-central-1.amazonaws.com/app1:$IMAGE_TAG

docker tag app1-batch:latest $AWS_ACCOUNT_ID.dkr.ecr.ca-central-1.amazonaws.com/app1-batch:$IMAGE_TAG
docker push $AWS_ACCOUNT_ID.dkr.ecr.ca-central-1.amazonaws.com/app1-batch:$IMAGE_TAG
Deployment of SVN Pipelines
Now that we have discussed how SVN pipelines work, I’d like to continue with describing the process of deploying them.
IaC
We use the Terraform Infrastructure as Code (IaC) tool for deploying our infrastructure. To create an AWS CodePipeline with the settings discussed above, we use the following code:
resource "aws_codepipeline" "pipelines" {
  for_each = local.pipelines

  name     = "svn-${each.key}-${local.branch}"
  role_arn = aws_iam_role.codepipeline.arn

  stage {
    name = "Source"

    action {
      name             = "Source"
      category         = "Source"
      owner            = "AWS"
      provider         = "S3"
      version          = "1"
      output_artifacts = ["source_output"]

      configuration = {
        S3Bucket             = local.build_bucket
        S3ObjectKey          = local.common_build_resources_path
        PollForSourceChanges = false
      }
    }
  }

  stage {
    name = "Build"

    action {
      name            = "Build"
      category        = "Build"
      owner           = "AWS"
      provider        = "CodeBuild"
      input_artifacts = ["source_output"]
      version         = "1"

      configuration = {
        ProjectName = local.codebuild_project_name
        EnvironmentVariables = jsonencode([
          {
            name  = "SOURCE_PROJECT"
            value = each.key
            type  = "PLAINTEXT"
          },
          {
            name  = "SOURCE_BRANCH"
            value = local.branch
            type  = "PLAINTEXT"
          }
        ])
      }
    }
  }

  artifact_store {
    type     = "S3"
    location = local.build_bucket
  }
}
Note: We set
PollForSourceChanges = false, as otherwise, you might run into limits on creating pipelines with enabled polling for source code changes, which is 60 as of the time of writing this article. This is useful to automatically start all pipelines whenbuildspec.ymlorbuild_stub.share modified, which usually happens very rarely.
For creating our AWS CodeBuild project we use the code below:
resource "aws_codebuild_project" "project" {
  name          = local.codebuild_project_name
  service_role  = aws_iam_role.codebuild.arn
  build_timeout = 30

  source {
    type      = "CODEPIPELINE"
    buildspec = "buildspec.yml"
  }

  environment {
    type                        = "LINUX_CONTAINER"
    image                       = "${local.ecr_repository_url}:latest"
    compute_type                = "BUILD_GENERAL1_SMALL"
    privileged_mode             = true
    image_pull_credentials_type = "SERVICE_ROLE"
  }

  vpc_config {
    vpc_id             = local.vpc_id
    subnets            = local.subnet_ids
    security_group_ids = [aws_security_group.codebuild.id]
  }

  artifacts {
    type = "CODEPIPELINE"
  }

  cache {
    type  = "LOCAL"
    modes = ["LOCAL_DOCKER_LAYER_CACHE"]
  }
}

resource "aws_s3_bucket_object" "common_build_resources" {
  bucket = local.build_bucket
  key    = local.common_build_resources_path
  source = "common_build_resources.zip"
}
I would like to mention here that our Terraform script creates all other resources, which are shared by all pipelines. For example: IAM roles and policies, the security group, as well as an IAM user with programmatic access to AWS for granting SVN hook access to create/start/delete SVN pipelines.
Another important aspect is that our svn-pipeline module needs some resources to exist for its deployment and work: Vpc, private subnets, build and artifacts Amazon S3 buckets, Amazon ECR repository, VPC Endpoints for Amazon S3 and CloudWatch Logs (for transferring your artifacts and build logs over AWS private networks, not through public Internet). If you are already using AWS Developer Tools I bet you already have and use these resources in your AWS account. In this case please skip deploying them in the next section, and instead modify /tf/ci/svn-pipeline module to use your resources.
If you don’t have these resources, I have written Terraform code which you can use to provision them. I split their deployment into 3 separate modules:
/tf/vpc, which creates Vpc and other networking resources in your AWS account;/tf/ci/common_resources, which creates build and artifacts Amazon S3 buckets;/tf/ci/ecrdirectory, which creates an Amazon ECR repository.
Note: All modules are examples only, and are created to show the working concept. For production deployments the code should be modified to add security and other features, for example: enable versioning, encryption and lifecycle policies for S3 buckets; add fine-grained ingress/egress rules for Security groups; secure access to VPC Endpoints, etc.
The reason why I split them into 3 separate modules is to separate their creation/deletion/modification lifecycle. I.e. I don’t want the VPC to be deleted if I use Terraform to delete my pipeline.
Deployment Instructions
Note: I use ca-central-1 AWS region in the pipeline code. Please change it to your desired region.
We have discussed all aspects of SVN pipelines and if you want to try them out I have prepared deployment instructions for you:
-
Provision the infrastructure in AWS (I used pseudo-code here to avoid repetition):
var directories = ["/tf/vpc", "/tf/ci/common_resources", "/tf/ci/ecr", "/tf/ci/svn-pipeline"] foreach (directory in directories) { Navigate to {directory}, add values in the locals section. Make changes to the module source if necessary and run Terraform } -
Create
/build/svnUserand/build/svnPasswordSecureString parameters in AWS Secrets Manager Parameter Store. -
Build and upload your custom Docker build image to your Amazon ECR build repository.
-
Setup an SVN hook on your SVN server:
- Install AWS CLI.
- Copy
post-committo your SVN repository (for example:/home/svn/repositories/repository_name/hooks/post-commit). - In
post-commitadd values for:AWS_DEFAULT_REGION, for example:ca-central-1;AWS_ACCESS_KEY_IDandAWS_SECRET_ACCESS_KEY, which you can copy fromsvn_user_access_key_idandsvn_user_secret_access_keyoutputs of thesvn-pipelineTerraform module;SVN_SERVER_HOME_DIRECTORY, which is the SVN server user home directory, for example:/home/svn.
- Create
$SVN_SERVER_HOME_DIRECTORY/hook-logdirectory for storingpost-commitscript logs. - Copy
pipeline.tmplto$SVN_SERVER_HOME_DIRECTORY/pipeline.tmpland edit it:- replace the placeholder
[[[your_aws_account_id]]]]with your AWS account id; - replace the placeholder
[[[build_bucket_name]]]with your Amazon S3 build bucket name, entered on step 1 in the/tf/ci/common_resources/main.tffile.
- replace the placeholder
- Allow your SVN server user to read and execute the
post-commitscript.
Note:
pipeline.tmplwas written using output from the AWS CLI for describing the structure of one of the trunk pipelines, created by our Terraform module. For example:aws codepipeline get-pipeline --name svn-app1-trunk -
Prepare a
build.shscript, create a branch of your SVN project which you setup to work with SVN pipelines on the previous step and commit yourbuild.shscript to your branch. It should automatically create a new pipeline for your branch and start the build. You should be able to see it in the AWS console. If for some reason it doesn’t work please check the logs in$SVN_SERVER_HOME_DIRECTORY/hook-logdirectory.
Conclusion
In this article we discussed the SVN pipelines architecture, adding CI automation, pipelines infrastructure provisioning and writing build scripts for your projects. Using the proposed approach and provided code, you can build your own CI solution for almost any source code repository or storage, which is not supported by AWS CodePipeline source action yet. This allows you to use cool AWS Developer Tools for more of your projects.
I hope you enjoyed this article and that you’ll find it useful for building your own CI solutions for your projects.
Happy coding!
Disclaimer: Code and article content provided ‘as-is’, without any express or implied warranty. In no event will the authors be held liable for any damages arising from the use of code or article content.
You can find sample sources for building this solution here.